Guide to Automating Meeting Notes with AI
Workflow to offload meeting note-taking to an AI assistant so you stay engaged in the discussion while capturing requirements, decisions, and action items.
| Type | Guide |
| Area | Automation, Meetings, Documentation |
| Description | Workflow to offload meeting note-taking to an AI assistant so you stay engaged in the discussion while capturing requirements, decisions, and action items. |
Contents
- 1. Task to automate
- 2. Workflow Overview
- 3. Tools & Setup
- 4. Prompts
- Identified Requirements
- Future Considerations & Nice-to-Haves
- Key Concerns, Risks, and Open Questions
- Other topics
- 5. First End-to-End Test
- 6. Pricing & Cost
- 7. Tips & Troubleshooting
1. Task to automate
As a Business Analyst or Product Owner, your most critical work happens during conversations with stakeholders. However, the need to capture every detail - requirements, decisions, action items - can pull your focus away from the conversation itself. You end up juggling active listening with frantic note-taking. This guide provides a workflow to offload that administrative work to an AI assistant, letting you stay fully engaged in the discussion while ensuring nothing gets lost.
| Aspect of Work | Manual Process | Automated Process |
|---|---|---|
| During Meetings | Manually typing notes while trying to listen and facilitate the discussion. | Focus more on facilitation. A recording and transcript capture the raw information. |
| After Meetings | Spending 15-30 minutes organizing, formatting, and interpreting raw notes. | Already structured summary requires few mins to clean up and double-check AI output before moving on. |
2. Workflow Overview
This workflow uses Make.com to orchestrate a series of steps that transform a raw transcript into a structured note. The process is designed to be modular, allowing for different types of meetings to be processed with tailored instructions.
Pre-Step: Create Meeting Transcripts
Before you can analyze meetings, you need to convert your meeting recordings into text transcripts. Here are the main methods to generate them.
Method 1: Microsoft Teams Recordings
- Automatic Transcription: Teams automatically generates transcripts for recorded meetings when transcription is enabled. Go to Settings → Privacy in Teams and ensure Transcription is turned on.
- Accessing the Transcript: After a meeting ends, the transcript is available in the meeting chat. Find the recording, click to open it, and you can view and download the transcript file (usually
.vtt).
Method 2: macOS Voice Memos (English only)
- Built-in Transcription: The Voice Memos app on macOS automatically transcribes English recordings.
- How to Use: Record your meeting, and the transcript will appear below the audio waveform. You can then use the “Share” button to copy the full text.
Workflow Steps: Create meeting summary
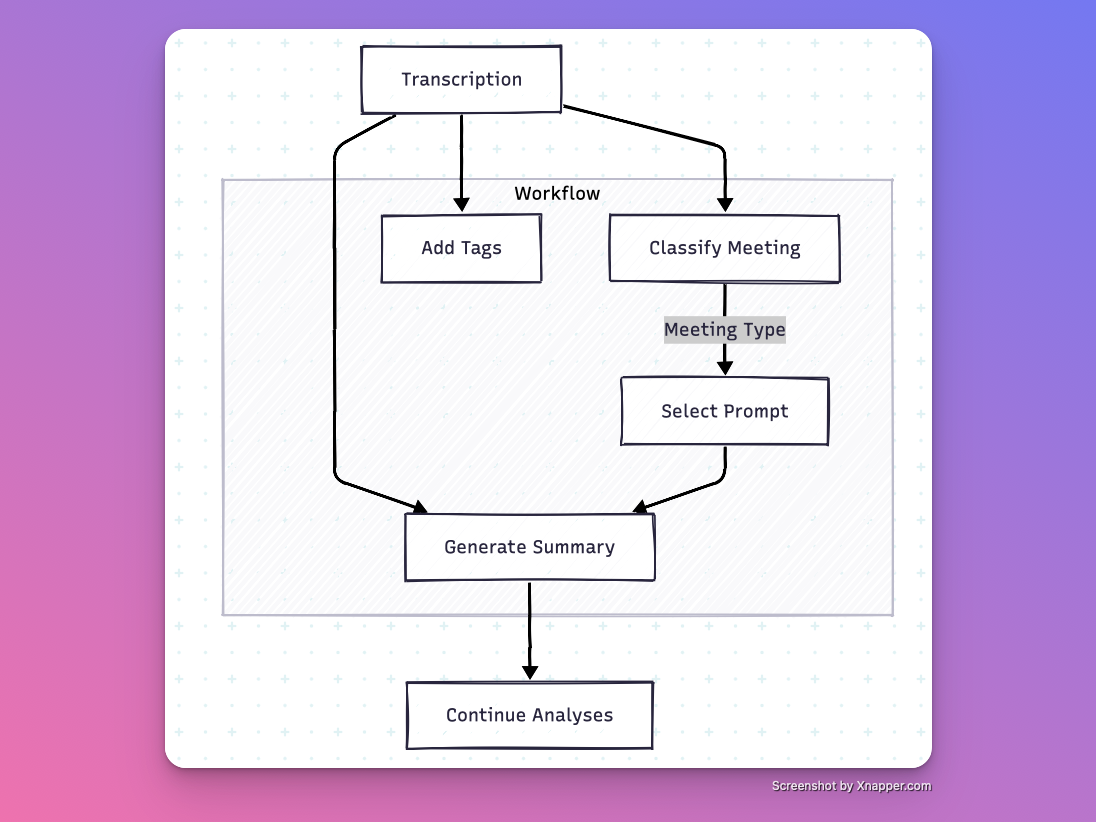
Once you have your transcript, the automated workflow follows these steps:
Step 1: Classify Meeting
A raw meeting transcript is first analyzed by an LLM to determine the meetingType (e.g., “Requirements Gathering,” “Stand-up”).
Step 2: Select Prompt
Based on the type, the workflow selects a specific, pre-written prompt from a library. This prompt contains instructions tailored to that meeting’s goals.
Step 3: Generate Tags
The LLM analyzes the summary to automatically create relevant tags based on the topics discussed. These tags make it easy to find notes around specific subjects later (e.g., “user authentication,” “payment flow,” “mobile app”).
Step 4: Analyze in Chunks
The full transcript is broken into chunks. Each chunk is analyzed by the LLM using the selected prompt. Optionally, project-specific context or a glossary can be included to improve accuracy.
- ℹ️ Why Chunking?
Even with large context windows, long transcripts can overwhelm LLMs, causing them to lose focus on important details. Chunking is a proven technique that improves accuracy by:- Splitting long content into smaller, easier-to-digest pieces
- Looking at each section one at a time, like reading a book chapter by chapter
- Making sure we don’t miss anything important by going through everything step by step
Step 5: Store Structured Output:
The final analysis is formatted and used to create records in Airtable and you can continue your analysis.
3. Tools & Setup
This section covers the setup for the core tools in the workflow. For each tool, you will need to either create an account or configure a specific service. The instructions for each are in the collapsible sections below. Complete these steps before moving on.
- Tool 1: Airtable - store structured meeting notes
The workflow uses an Airtable base to store the outputs of workflow - meeting summary.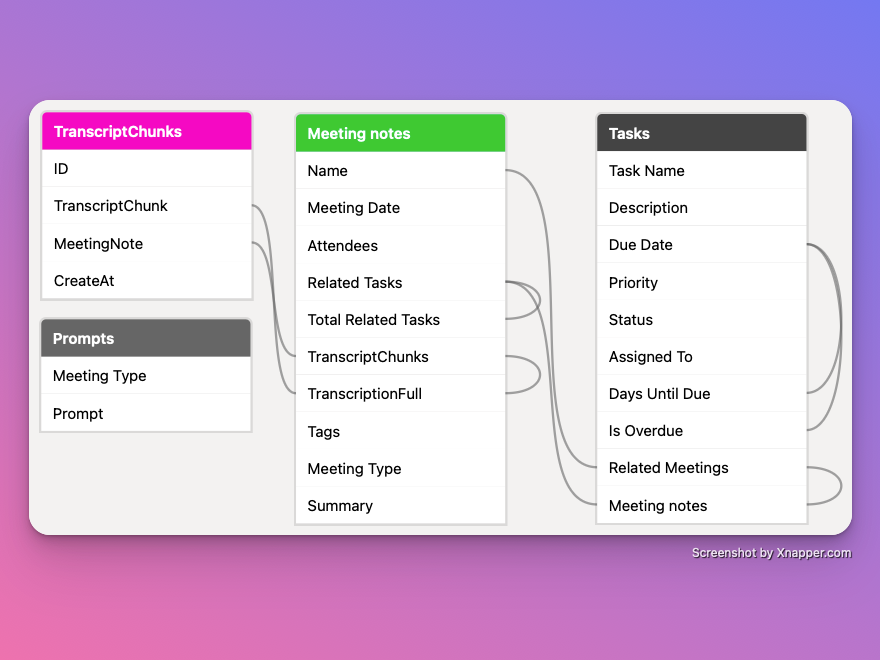
- Create Account & Copy Template:
- Create a free Airtable account at airtable.com if you don’t have one.
- Use this template link to copy the pre-configured base: Link to copy base
- The template includes all necessary tables, fields, and a ready-to-use interface for viewing meeting notes and also managing tasks.
Watch on YouTube
2. Customize (Optional):- The template comes with everything set up, but you can freely adjust fields, views, and interfaces to match your specific needs.
3, Connection Setup:- The Make.com integration uses OAuth authentication to connect to your Airtable account, so you don’t need to copy any Personal API key
4. Free Tier Includes- 1,000 records per base
- 100 automation runs
- Interface Designer
💡 Capacity Note: Each 1-hour meeting typically creates 4-5 records (due to transcript chunking), so the free tier supports approximately 200-250 meetings per base.
5. Security & Compliance:- Check Airtable’s Trust & Security page to verify if their security standards meet your project’s requirements.
Additional Information (Optional)
If you want to learn more about Airtable’s capabilities before proceeding with setup, expand this section:- Why Airtable?
Airtable is essentially a spreadsheet on steroids that functions as a relational database. This makes it perfect for storing and organizing meeting notes because:- Easy Search & Filter: You can quickly search across all your meeting notes, filter by meeting type, date, or tags to find exactly what you’re looking for.
- Custom Interfaces: Airtable lets you create custom interfaces, so you can build your own meeting notes app with exactly the views and layouts you need.
- Extensible: After each meeting, you can easily add follow-up tasks and view them as a Kanban board, turning your meeting notes into a complete project management system.
- API Access: Airtable is easily accessible via API, and there are already MCP (Model Context Protocol) servers created for it. This means you can use it as a tool directly from VS Code, Cursor, or Claude - once configured, you can reference your meeting notes right from there.
📋 MCP Integration Setup: I show how to configure MCP server integration in Guide to ‘conversational’ Backlog management with VS Code / Cursor
- Create Account & Copy Template:
- Tool 2: Azure OpenAI - hire LLM to generate notes from meeting about requirments
This is the AI engine that performs the analysis. We’ll use Azure AI Foundry to deploy advanced models like o1-mini for creating meeting summary with enterprise-grade security and compliance. Azure AI Foundry is Microsoft’s unified platform for accessing AI services like Azure OpenAI, which includes the latest OpenAI models, including reasoning models.
Watch on YouTube
Getting Started with Azure AI Foundry
To use Azure AI Foundry for meeting analysis, you’ll need to follow these steps to set up your API access:- Create Azure Account
- Sign up for a free Azure account at azure.microsoft.com
- Add subscription group
- You’ll need a credit card for verification
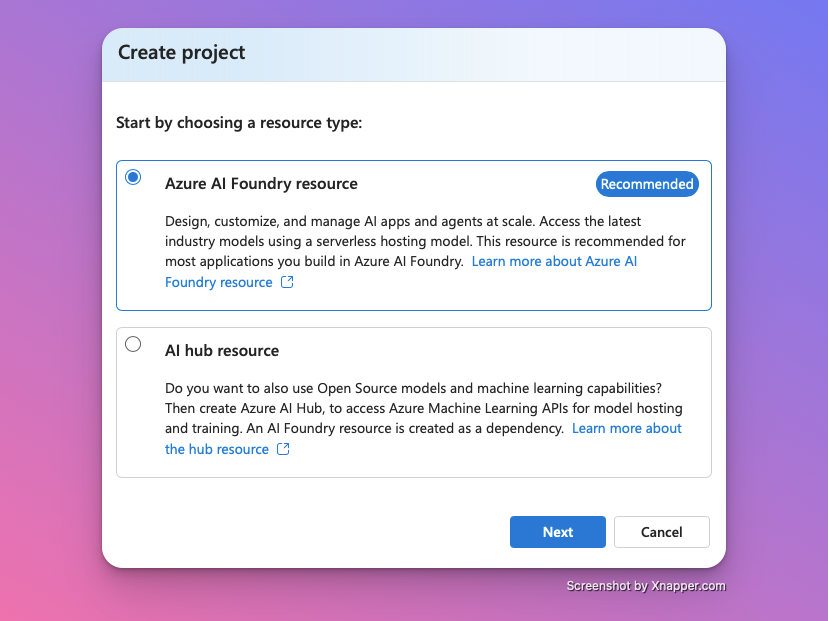
- Access Azure AI Foundry Portal
- Go directly to ai.azure.com
- Sign in with your Azure account
- click to create new resource
- select subscription group
- select region
- Deploy Model
- In Azure AI Foundry, go to “Model catalog”
- Search for “o1-mini”
- Click “Deploy”
- Get API Credentials
- Go to “Models + endpoints” or “Deployments”
- Click your deployment
- Copy the “Target URL” and “Key”
- These credentials will be used in Make.com setup
💡 Note: Keep your API credentials secure. You’ll need them later when configuring the Make.com scenario.
7. Security & Data Privacy:- With Azure AI Foundry, you deploy your own private model instance, not using the public OpenAI API.
- Your meeting data is NOT used to train or improve the underlying models - this is a key advantage over public APIs.
- Data stays within your Azure subscription and follows your organization’s data residency and compliance requirements.
Model Selection:
For meeting analysis, I recommend o1-mini for its superior reasoning capabilities and cost-effectiveness compared to larger models.
Important Make.com Limitation: The Make.com Azure OpenAI connector uses an outdated API version (2023-05-15) that doesn’t support newer reasoning models like o3-mini. Make.com support acknowledges this limitation but provides no ETA for updates.Ensure you follow the correct instructions - Setup for o3-mini (HTTP module), which includes using the HTTP module instead of the Azure OpenAI module.
- Create Azure Account
- Tool 3: Dropbox - for meeting transcript storage
Instead of sending large transcript files through webhooks (which have size limits), you store transcripts in the cloud and send only the filename to trigger processing. This approach is more robust and scalable. For this guide, we will use Dropbox.
1. Create a Dropbox Account:
If you don’t have one, sign up for a free account at dropbox.com. The free tier offers 2 GB of storage, which is more than enough for thousands of transcripts.
2. Create a Dedicated Folder:- Inside your Dropbox, create a new folder named
Meeting Transcripts. This is where you will upload the files you want to process. - You can choose a different name, but make sure to use the same path when you configure the Make.com scenario.
3. Connection Setup: The Make.com integration uses OAuth to connect to your Dropbox account. When you set up the scenario, Make.com will guide you through a simple sign-in process to grant access. - Inside your Dropbox, create a new folder named
- Tool 4: Make.com — For Workflow Automation
Make.com is the automation platform that connects the other tools.
1. Import the Blueprint:- In the Make.com dashboard, go to Scenarios → Create new scenario.
- In the scenario editor, click the “More” menu (…) and choose Import Blueprint.
- You can download ready blueprints here → https://spyrosoft-my.sharepoint.com/:f:/g/personal/cezary_kulis_unravel_cc/EtEkrIFTcapOkreA22QxPFABL0FqxMjdCbfnp0NoX6kiCQ?e=o44JfS, everyone within Spyrosoft Group should have access, if not please request or just DM me.
- You will find two scenarios there, Create Meeting notes - that one is mandatory to import, rewrite is optional if you want to change meeting type and re-run AI summary
- The blueprint automatically splits all transcripts into 10,000-character chunks for optimal AI analysis, regardless of your transcript source.
2. Create Webhook:- The first module in your scenario should be a Webhooks → Custom webhook
- Click on the webhook module and click Add to create a new webhook
- Copy the webhook URL that appears - you’ll use this to trigger the scenario
3. Add Security Filter:- After the webhook module, add a Filter to prevent unauthorized access
- Set the filter condition:
key(from webhook data)Text operator: Equal to {your-secret-key} - Choose a strong secret key (e.g.,
wU1R5WvDK6CGQXNDOuQi6YoLxfI6wFeL), you can use these website to generate random secret keys -> https://secretkeygen.vercel.app or https://djecrety.ir - Only requests with the correct key will proceed to the next modules
4. Connect the Modules:- The imported scenario will have errors on the Airtable, OpenAI, and Dropbox modules (showing as red/orange indicators).
- For Airtable modules: Click on each module and create a new connection. Make.com will guide you through the OAuth process to connect to your Airtable account.
- For Azure OpenAI modules: Click on the module and add a new connection using the API key and endpoint you saved from the Azure setup.
- See this if you want to use o3-mini model with HTTP module
- If you want to use o3-mini, then you need to use HTTP Module, ensure you download then this bluebrint AIDD Create Meeting Summary (demo) (HTTP module).blueprint→ Bluebrint for Workflow with HTTP Module
- In blueprint you will find new modules “Create JSON” just before HTTP modules, the purpose of is it to ensure the structure of request in HTTP module is always correct.
See videos below to check how to set up HTTP module and Create JSON module - Configure HTTP module
See here how to setup HTTP module to connect workflow with AI. This instruction is showing how to use HTTP module to connecte with Azure Open AI, instead of using native AzureOpenAI module in make.com
Watch on YouTube - Configure Create JSON module
See here how to setup additional JSON module to prepare a request fot HTTP Module to connect workflow with AI.
Watch on YouTube
Prompt to copy for meeting type - request:You are an expert meeting summarization AI specializing in extracting the type and tags from various types of meetings. Your task is to analyze a meeting transcript and meeting name to determine the meeting type and generate relevant tags. Primary meeting type is Requirements Gathering. Read and analyze the following meeting transcript: <transcript> {{YOUR TRANSCRIPT CHUNK}} </transcript> and name of the meeting {{YOUR FILE NAME}} Based on the content of the transcript and meeting name, determine the type of meeting from the following options. Choose only one: - Requirements Gathering - This is a session where we discuss features, requirments and scope of the IoT system from functional and non-functional point of view, without going into details about UI and technical details, like architecture or backend. It should be a primary meeting type, unless discussion has majority (85%) of discussion arround other topics. - Vision Alignment - This strategic discussion validates the long-term product vision and high-level goals with prodcut manager. - Backlog Refinement - This is a discussion with whole team about PBIs in backlog, clarifing requirments with dev team so items are ready for upcoming sprints. - Technical Feasibility - This is only reserved for discussion engineering when we talk how we are thinking of implementing feature from techcnial poin of view, working on some tradeoffs, or engineering is talking about feasibility or possible blockers - Roadmap - This planning session maps epics and features onto a timeline, aligning resources and dependencies for the next release cycle or quarter - Prioritization - discussion between engineering and/or product managers in which the next sprint’s scope is negotiated (items moved up, deferred, or dropped) and the decisions and their rationales are explicitly agreed upon. - Design Synch -Discussing UX and UI of prepared mockups or things that we need to do form design process. - Generic - if you not any from above identified, then return Generic Rules Backlog Refinement is only when name contains backlog refinement. Sprint Planning is only when name contains sprint planning . Next, generate relevant tags for quick searching. These should include topics, requirements, and major themes discussed in the meeting. Aim for 3-6 tags that best represent the key points of the meeting. Googe example of tags: automation creation, alert propagation, Event-based automation Bad examples: Figma, PBIs, Design, Backlog, Sprint, Release planning Provide your output in JSON format with the following structure: { "Meeting Type": "chosen meeting type", "Tags": "comma-separated list of tags" } Your response should consist only of the above JSON structure. Do not include any explanations, additional text, or XML tags in your output.
- See this if you want to use o3-mini model with HTTP module
- For Dropbox modules: Click on Dropbox module and create a new connection. Make.com will guide you through the OAuth process to connect to your Dropbox account.
- For Slack modules (Error Handling): Click on Slack modules to create new connection and send notification for error handling. especially useful for LLM modules that due to applied filters or response time can throw error and disable workflow.
4. Prompts
The workflow uses a two-step approach to analyze meetings:
Meeting Type Detection
- The “Meeting Type” module in Make.com uses Azure OpenAI to analyze the first chunk of transcript
- It determines what type of meeting this is (e.g., “Requirements Gathering”, “Design Review”)
- If you want to add new meeting types or change the classification logic, modify this module
Transcript Analysis with Custom Prompts
- Airtable module searches by meeting type name to find the corresponding prompt
- Module responsible for analyzing transcript uses that specific prompt to analyze the full transcript
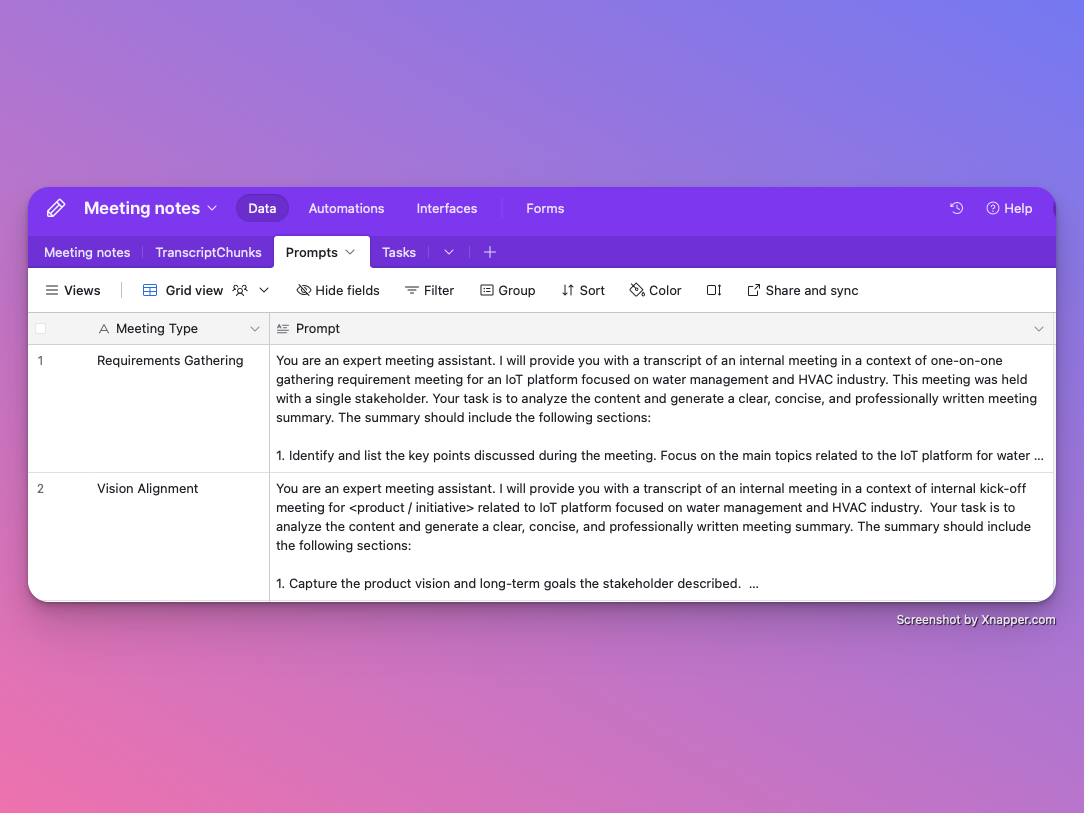
Managing Prompts in Airtable
All prompts are stored in your Airtable base, making them easy to edit and test. You can find them in copied base from previous steps. Keep in mind, they are working in my context of the project. Use this as an base example and adjust to context of your project and your work.
Customizing for Your needs
- Edit existing prompts: Go to Airtable → Prompts table → Edit the prompt text
- Test prompt changes: Run a test meeting through the workflow to see improved output
- Add new meeting types:
- Add new prompt in Airtable
- Update the “Meeting Type” module in Make.com to recognize the new type
- No code changes needed: All prompt adjustments happen in Airtable’s user-friendly interface
Main prompt for analyzing meetings related to requirements gathering. It is giving a contect of my project, please go and adjust thinks related to product or system you are working on, domain, etc.
<role>
You are an expert Business Analyst and Systems Engineer specializing in IoT platforms. Your primary goal is to meticulously analyze a meeting transcript to extract, categorize, and score all system requirements. The context is a requirements-gathering meeting for a new IoT platform focused on the water management and HVAC industries.
</role>

<core Instructions>
1. Requirement Clustering: You must dynamically identify logical topic clusters based on the flow and content of the conversation in the transcript. Group all identified requirements under these self-derived topic headings (e.g., User Authentication,Real-time Dashboard,Alarming & SMS Notifications,Device Provisioning,etc.).

2. Requirement Classification (Type):
For each requirement, classify it as either Functional or Non-Functional

Functional (F): Describes what the system must do. It defines specific behaviors, functions, or features. (e.g., "The system shall send an email alert when a pump's pressure exceeds a set threshold".)

Non-Functional (NF): Describes how the system should perform a function.
It defines the qualities of the system, such as performance, security, reliability, or usability. (e.g., "All dashboards must load within 3 seconds","The system must support 100 concurrent users".)

3. Certainty Scoring:
For each requirement, assign a certainty score on a scale of 1 to 5 based on the stakeholder's language.
5 (Mandatory): The requirement was stated as an absolute necessity. Language used: "we must have,it is mandatory,the system shall," "a critical requirement is..."
4 (High): The requirement was explicitly stated as a firm need, but without absolute language. Language used: "we really need,"n"it's important that," "the users will expect..."
3 (Medium): The requirement is not explicitly stated but is strongly implied or can be logically inferred from a stated problem or goal.
2 (Low): The requirement was mentioned as a possibility or a "nice-to-have." Language used: "it might be nice if," "we could consider," "perhaps we can..."
1 (Vague Idea): The requirement was mentioned as a passing thought or a "what if" scenario with no commitment.

Rationale: For every requirement, provide a single-sentence rationale for your classification and scoring, including a direct quote or a specific reference from the transcript that supports your analysis.

Handling Ambiguity: Requirements scoring a 1 or 2 on the certainty scale should be placed in the "Future

4. Considerations & 'Nice-to-Haves' section to keep the primary requirements list focused on committed items.

5. List other topics not related to requirements but discussed during the meeting.

6. Ignore small talk, filler words, and off-topic remarks. Focus on capturing the core discussions.
</core Instructions>

<output structure>
## Identified Requirements
This section details the specific requirements extracted from the transcript, clustered by topic. Only include requirements with a certainty score of 3 or higher.

### Topic: [Self-derived topic, e.g., Real-time Data Visualization]
Requirement: [A clear, concise statement of the requirement.]
Type: [Functional / Non-Functional]
Certainty: [Score from 3-5]
Rationale/Source: [One-sentence justification with a supporting quote or reference from the transcript.]
Requirement: [Next requirement statement.]
Type: [Non-Functional]
Certainty: [Score from 3-5]
Rationale/Source: [One-sentence justification with a supporting quote or reference from the transcript.]

### Topic: [Next self-derived topic, e.g., Alerting System]
(Continue this structure for all identified topics and requirements with certainty >= 3.)

## Future Considerations & 'Nice-to-Haves'
A bulleted list of ideas, suggestions, and potential future features that were mentioned but are not firm requirements at this stage (Certainty score 1 or 2).

[Idea/Suggestion] - (Certainty: [1 or 2]) - Source: [Brief quote or context from transcript.]
...
## Key Concerns, Risks, and Open Questions
A bulleted list of any challenges, potential roadblocks, or unresolved questions raised during the meeting that require further investigation.

Concern: [Description of the concern.]
Open Question: [Question that needs an answer before proceeding.]"

## Other topics:
- [Description of the topic1]
- [Description of the topic2]

...
</output structure>
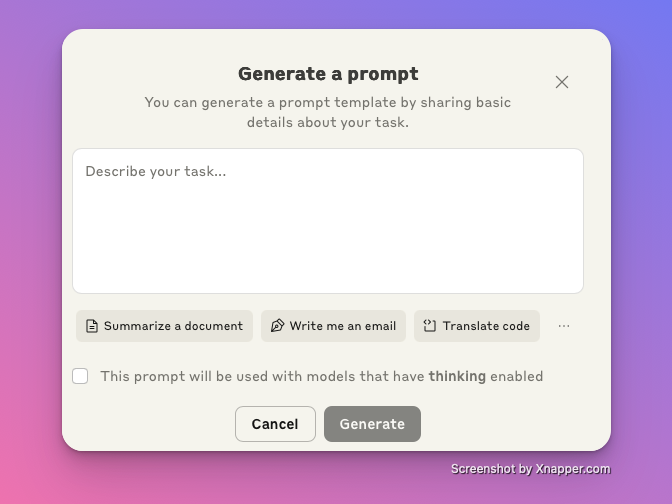
If you need help with creating prompts, you can try to have a first draft using Claude Prompt Generator, it requires to have credits on Claude to use it. Here lis a link → https://console.anthropic.com/dashboard
5. First End-to-End Test
Step 1: Prepare Make.com for Testing
- Open your Make.com scenario in edit mode
- Click “Run once” button - the scenario will now wait for a webhook trigger
- Keep this browser tab open to watch the live execution
Step 2: Upload Test Transcript
- Open your Dropbox account (web or desktop app)
- Navigate to the folder your Make.com scenario is configured to watch (e.g.,
/Meeting Transcripts/) - Upload the sample file or any transcript file
Step 3: Trigger the Workflow
If you are not familiar with technical tools, don’t worry, this step is easier than it looks! You will need to use the “Terminal” (on Mac) or “Command Prompt” (on Windows) to send a message to the workflow. This is a standard way to test automations, and you don’t need to know how to code.
How to do it:
- Open the Terminal or Command Prompt:
- On Windows: Press the Windows key, type
cmd, and press Enter. - On Mac: Press
Cmd + Space, typeTerminal, and press Enter.
- On Windows: Press the Windows key, type
- Copy and paste the following command into the window:
curl -X POST "<your-webhook-url>" \ -H "Content-Type: application/json" \ -d '{"key":"your-secret-key","name":"2024-01-15-standup-example"}'- Replace
<your-webhook-url>with the actual URL provided by Make.com. - Replace
"your-secret-key"with your real secret key if you have one.
- Replace
- Press Enter to run the command.
Tip: If you see a response like {accepted} or similar, it means your workflow was triggered successfully!
Alternative for Mac Users: Apple Shortcut ()
If you’re using macOS, there’s an easier way to trigger your workflow:
- Download the pre-built shortcut: Meeting Analysis Trigger Shortcut
- Configure the shortcut:
- Open the shortcut in the Shortcuts app
- Replace
<your-webhook-url>with your actual Make.com webhook URL - Replace
<your-secret-key>with your actual API key
- Use it anytime:
- Run the shortcut (from Shortcuts app, Spotlight, or add to your dock)
- It will prompt you to select a transcript file name (must match the file you uploaded to Dropbox)
- The shortcut automatically sends the webhook and triggers your workflow
Step 4: Monitor Live Execution
- Watch the live run log in Make.com - modules should turn green one by one
- If any module shows red/orange, click on it to see the error details
- Adjust connections or settings if needed and run again
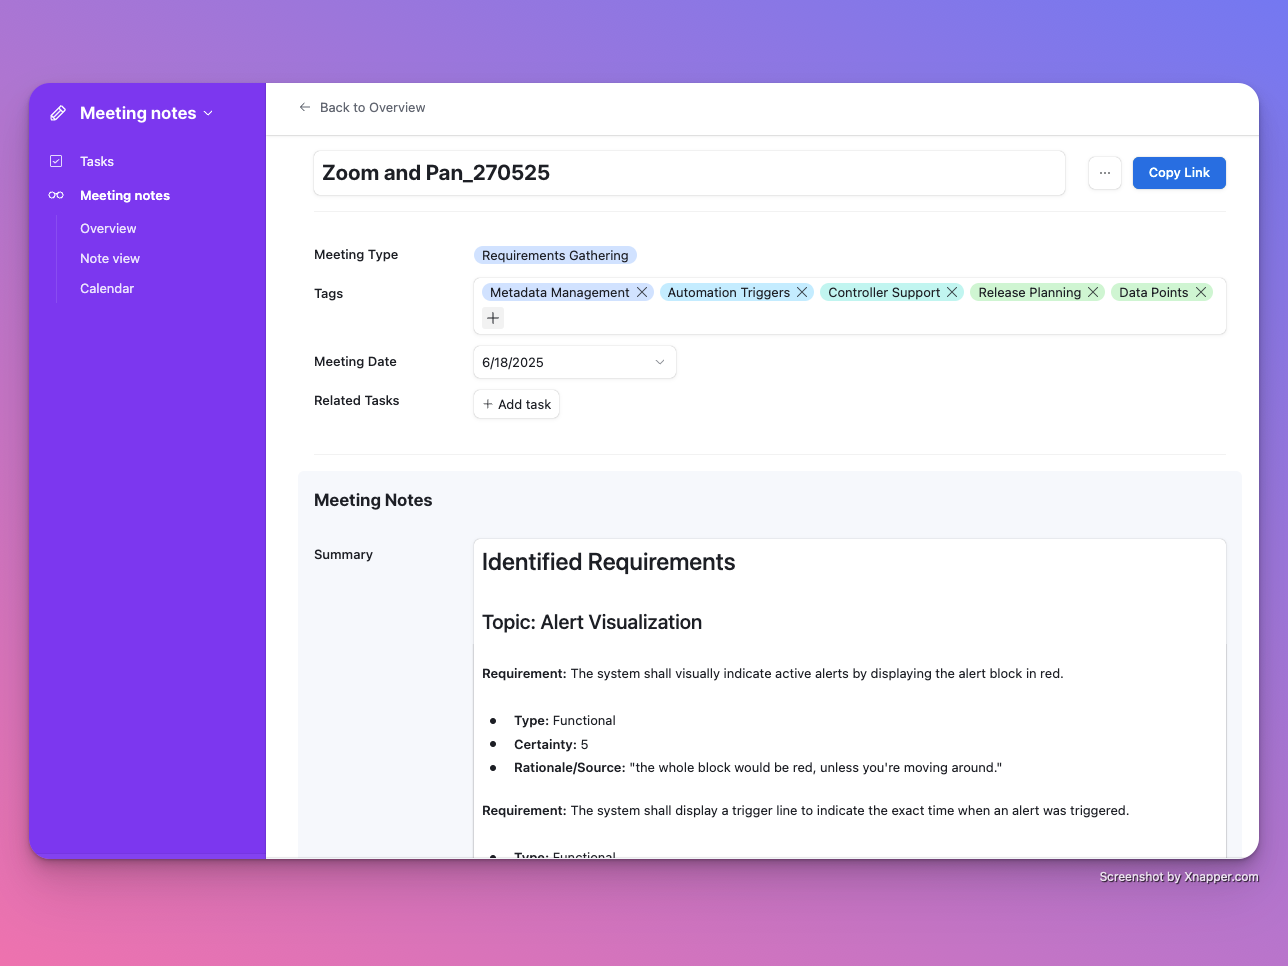
Step 5: Verify Results
- Go to your Airtable base
- Check the “Meeting Notes” table for new summary records
- Or use the Interface app for a better viewing experience
6. Pricing & Cost
This workflow is designed to be highly cost-effective, leveraging the generous free tiers of several services. Here is a breakdown of the costs for each tool involved.
Summary of Costs
| Tool | Free Tier | Cost for this Workflow | Notes |
|---|---|---|---|
| Make.com | 1,000 operations/month | Free | A 1-hour meeting uses ~40 operations. The free tier supports ~25 meetings per month. |
| Azure OpenAI (o1-mini) | Pay-as-you-go | ~$0.02 per 1-hour meeting | Costs are extremely low. 25 meetings would cost approximately $0.50. |
| Dropbox | 2 GB storage | Free | Transcript files are very small. 2 GB is more than enough space. |
| Airtable | 1,000 records/base | Free | The free tier is sufficient to store notes from 140-160 of meetings. |
7. Tips & Troubleshooting
This section covers common issues and frequently asked questions.
Transcript Storage Alternatives
While this guide uses Dropbox, the Make.com workflow can be easily adapted to other cloud storage providers.
- Airtable Attachments: You can create a meeting record in Airtable first and attach the transcript file directly. An Airtable automation can then trigger the Make.com webhook. This is useful if you want to manually control which meetings get processed.
- OneDrive / Google Drive: Both services have modules in Make.com that can watch for new files in a folder, just like the Dropbox module. You can swap the Dropbox module with one for OneDrive or Google Drive without changing the rest of the workflow. Note that using OneDrive in a corporate environment might require administrator approval.
Output Storage & Analysis
If you prefer to work with local files instead of Airtable, you can change the end of the workflow.
- Dropbox + Local Analysis: Configure the final module in Make.com to save the generated summary as a Markdown (
.md) file in a Dropbox folder. You can then use local tools like Obsidian or Logseq to read and analyze the notes on your computer.
Security & Privacy
⚠️ CRITICAL: Always Secure Your Webhook A webhook is a public URL. Without a security check, anyone who finds the URL could trigger your workflow, potentially costing you money in service fees (like Azure credits).
- Use a Secret Key: The guide includes a step to add a filter in Make.com that checks for a secret key. Do not skip this step.
- Keep it Secret: Never share the secret key publicly.
- Rotate Periodically: For best practice, change your secret key every few months.